How to Change Ear Tips on AirPods Pro 3 (Step-by-Step)
A good seal is the difference between AirPods Pro 3 that sound incredible and a pair that constantly feel like they’re about to fall out. Learning how to change ear tips on AirPods Pro 3 takes about 30 seconds per bud once you know the right grip, but there’s a real technique to it — pull from the wrong spot and you’ll think the tips are stuck, attach them slightly crooked and they’ll pop off inside your ear. This guide walks through removing the old tips, snapping the new ones on correctly, picking the right size for each ear, and confirming the fit with Apple’s built-in Ear Tip Fit Test.
Key Takeaways
- AirPods Pro 3 uses foam-infused tips in five sizes — and they don’t fit older AirPods Pro models
- Remove tips by gripping the base and pulling straight off — no tools required
- New tips are properly attached only when you feel them click flush onto the oval connector
- Each ear can use a different size — seal and comfort matter more than symmetry
- The Ear Tip Fit Test on your iPhone objectively confirms whether your seal is good
What You Need Before Changing AirPods Pro 3 Ear Tips
The good news is that this job requires no tools at all. Before you start, gather a few things so the swap takes under two minutes:
- Both AirPods Pro 3 earbuds, removed from the charging case and from your ears.
- Your new ear tips. AirPods Pro 3 ships with a full set of sizes in the box, and you can also buy official replacement tips or third-party tips designed specifically for this model.
- Clean, dry hands. The foam-infused material grips better — and stays cleaner — when your fingers aren’t oily or damp.
- A flat, well-lit surface. Ear tips are small, light, and surprisingly bouncy. Work over a desk or table rather than a couch, bed, or carpet where a dropped tip can vanish.
- A lint-free cloth or soft brush (optional but recommended). With the tips off, it’s the perfect moment to clear earwax from the speaker mesh.
- Your iPhone or iPad nearby if you plan to run the Ear Tip Fit Test afterward, which you should.
That’s everything. No prying tools, no heat, no adapters — the tips are designed to come off with finger pressure alone.
AirPods Pro 3 Ear Tip Sizes and Compatibility Explained
AirPods Pro 3 introduced a redesigned ear tip. Instead of the all-silicone construction used on earlier models, these are foam-infused tips: a thin silicone outer shell with a foam-based interior that compresses slightly and conforms to the shape of your ear canal. The result is a more adaptable acoustic seal, which is a big part of why the noise cancellation improved on this generation.
Apple includes five sizes in the box: XXS, XS, S, M, and L, with medium installed on the earbuds out of the package. The addition of an extra-extra-small size helps people with smaller ear canals who found even the XS tips on previous models uncomfortable.
One compatibility point trips up a lot of buyers: AirPods Pro 3 ear tips are not interchangeable with AirPods Pro (1st or 2nd generation) tips. The attachment mechanism and connector shape are different, and AirPods Pro tips don’t fit standard AirPods either. When shopping for replacements — whether from Apple or a third-party brand — confirm the listing explicitly says it’s made for AirPods Pro 3. A “universal AirPods Pro” tip from an older product line won’t seat correctly.
Also worth knowing: each ear tip has its size letter printed on it, so you can verify what you’re holding, and there’s no rule that says both ears must match. Many people end up with a medium on one side and a small on the other.
How to Remove the Old Ear Tips from AirPods Pro 3
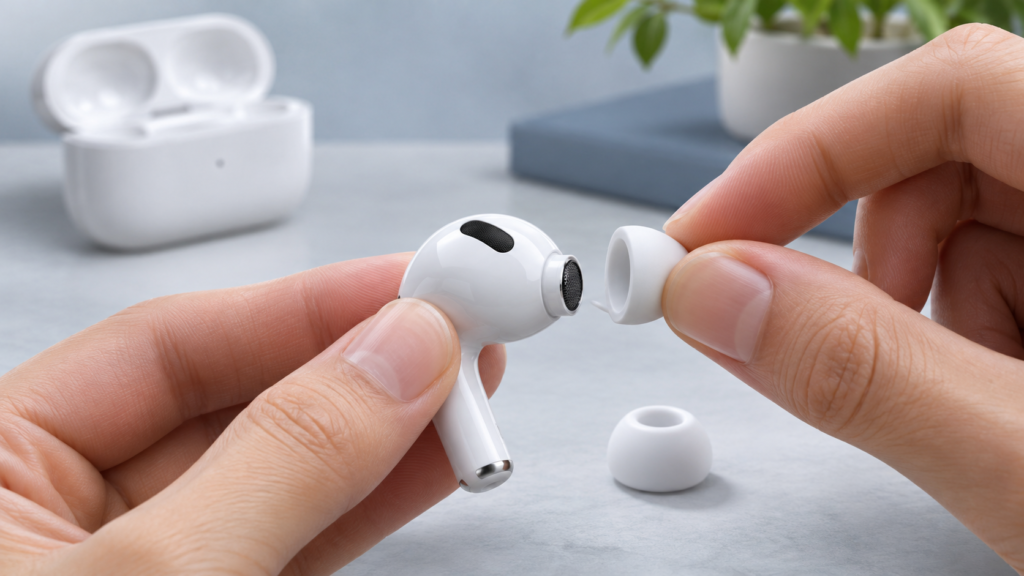
The tips snap onto an oval connector on each bud, so removal is a straight pull — but grip location matters. If you grab the soft dome of the tip, it just stretches. Here’s the correct method:
- Hold the earbud firmly in one hand, with the ear tip pointing away from you.
- Pinch the tip at its base — the firm ring where the tip meets the body of the bud — between your thumb and forefinger. This is the key step. Gripping the base means you’re pulling the connector collar itself, not stretching the foam dome.
- Pull straight away from the bud with firm, steady pressure. The tip will snap off the oval connector. It takes more force than most people expect the first time, and that’s normal — the tips are designed not to fall off accidentally.
- Repeat on the other earbud.
A slight side-to-side wiggle while pulling can help break the seal if the foam material feels grippy, but avoid twisting hard or pulling at an extreme angle. Never pull on the mesh end or try to dig the tip off with a fingernail or tool.
If your fingers keep slipping, wrap the tip in a dry cloth or paper towel for extra grip. Once the tips are off, take a quick look at the speaker mesh on each bud — this is the easiest opportunity you’ll get to clean out any wax buildup before the new tips go on.
How to Attach the New Ear Tips Correctly
Attachment is easier than removal, but most “tips falling off” complaints trace back to a tip that was never fully clicked on. Follow these steps:
- Check the size letter on the tip you’re about to install so you know which size is going on which ear.
- Align the tip’s opening with the oval connector on the earbud. The connector is oval-shaped and keyed, so the tip only seats correctly in one orientation — rotate it until the shapes line up.
- Press the base of the tip firmly onto the connector until you feel and hear a distinct click. The base of the tip should sit completely flush against the bud with no visible gap.
- Verify the attachment. Give the tip a gentle tug — it should stay put — then squeeze the dome and confirm it springs back into shape.
- Repeat for the second earbud, then place both in your ears and lightly twist to seat them.
The single most common mistake is pushing the tip on at a slight angle. It’ll feel attached, but only one edge of the collar has actually engaged — and the tip pops off later, often inside your ear or inside a pocket. If you can’t see a clean, gap-free ring where the tip meets the bud, pull it off and reseat it.
Also note that the tip doesn’t rotate freely once attached. If it seems to be pointing the wrong direction, it’s misaligned — remove it and try again rather than twisting it while it’s seated.
How to Choose the Right Ear Tip Size for Your Ears
Size selection isn’t about what “should” fit — it’s about what creates a comfortable, consistent seal in your specific ear canals. Start with the medium tips that come preinstalled, wear them for a few minutes of music playback, and then evaluate based on these signs.
Signs the tip is too small:
- The bass sounds thin and the overall audio feels distant or hollow.
- The bud feels loose, shifts when you talk or chew, or falls out during a walk.
- You can clearly hear room noise even before checking whether noise cancellation is on.
- The Ear Tip Fit Test fails repeatedly.
Signs the tip is too large:
- You feel pressure, aching, or soreness in the ear canal after short sessions.
- The tip won’t insert far enough and the bud sits awkwardly proud of your ear.
- The bud slowly works its way out as the compressed foam pushes back.
What a correct fit feels like: gentle, even pressure when you insert the bud with a slight twisting motion, noticeably fuller bass, and a clear drop in ambient noise the moment the buds go in — before ANC even engages. Think of it like a seal rather than a plug jammed into place.
Work one size at a time. If medium feels loose, try large before jumping to anything else. If medium hurts, drop to small or XS. Because the AirPods Pro 3 tips have foam inside, it helps to gently compress the dome as you insert it, then hold the bud in place for a few seconds while the material expands against your ear canal.
Finally, don’t assume your ears match. Ear canal asymmetry is extremely common, and plenty of people get the best results with, say, a small on the left and a medium on the right. The fit test evaluates each bud independently for exactly this reason.
How to Run the Ear Tip Fit Test on Your iPhone
Apple built an acoustic test directly into iOS that removes the guesswork. It plays a short clip of music and uses the AirPods’ internal microphones to measure how much sound is leaking from each ear, then tells you whether your seal is good.
- Put both AirPods Pro 3 in your ears with your chosen tips attached.
- On your iPhone (or iPad), open Settings and tap your AirPods’ name near the top of the menu — or go to Settings > Bluetooth and tap the (i) button next to your AirPods Pro 3.
- Scroll down and tap Ear Tip Fit Test.
- Tap Continue, then tap the play button to start the test.
- Stay still and quiet for the few seconds of audio. You’ll see a result for each ear.
“Good Seal” means you’re done. If the test says to adjust the fit or try a different size, reseat the bud first — sometimes that’s all it takes — then rerun the test. Still failing? Move up a size and test again. Apple’s official guide to AirPods Pro ear tips and the Ear Tip Fit Test covers the same process if you want the manufacturer’s reference.
A few practical notes: run the test in a reasonably quiet room for the most reliable results, make sure your iPhone is on a current version of iOS so the feature behaves properly, and rerun the test every time you change sizes. If a pending iOS update won’t install because your phone is full, our guide on ways to free up storage space on your smartphone can help you clear room.
One limitation to be aware of: the Ear Tip Fit Test is an iPhone and iPad feature. If you pair your AirPods Pro 3 with an Android phone, there’s no equivalent built-in test — you’ll need to judge the seal by bass response and how much outside noise is blocked.
Cleaning and Maintaining AirPods Pro 3 Ear Tips
Ear tips sit in a warm, waxy environment for hours a day, so a quick cleaning habit extends their life and keeps the mesh clear for better sound.
Cleaning the tips: Remove the tips from the buds first. Because the AirPods Pro 3 tips contain foam, don’t soak them or run them under the tap the way you might with pure silicone tips — the foam absorbs moisture and dries slowly. Instead, wipe the silicone outer shell with a dry or very slightly damp lint-free cloth, and keep moisture away from the mesh and the foam interior. If you do get them damp, let them air-dry completely — ideally overnight — before reattaching, since trapping moisture against the bud isn’t great for either component.
Clearing the mesh and nozzle: Earwax tends to collect in two places — the mesh at the tip’s base and the speaker mesh on the bud itself. Use a dry cotton swab or a clean, soft-bristled brush (a baby toothbrush works well) with light strokes. Never poke into the mesh with a toothpick, needle, or anything sharp, and don’t use liquid cleaners on the bud.
When to replace the tips entirely:
- The silicone shell is torn, split, or peeling away from the foam.
- The foam no longer springs back after being compressed.
- The tip feels loose on the connector even when fully clicked in.
- Grime or discoloration won’t come off with normal cleaning.
With daily use, expect to swap in fresh tips every few months to keep the seal consistent. Apple sells replacement sets through its online and retail stores, and third-party options exist — just verify they’re made specifically for AirPods Pro 3.
Troubleshooting: Loose Tips, Poor Seal, and Other Common Problems
The tips keep falling off. Almost always, the tip never fully clicked onto the connector. Reseat it, confirm the base sits flush, and tug-test it. If it still detaches, double-check you aren’t accidentally using AirPods Pro 1/2 tips — they can appear to go on but won’t lock properly on the Pro 3 connector.
The fit test keeps failing. Work through it methodically: reseat the bud, clean the mesh, try the next size up, then retest. Hair, glasses arms, or hats pressing on the bud can break the seal during the test too.
Your ears hurt after an hour of wear. Drop down a size — foam tips apply more sustained pressure than plain silicone, so a size that felt “fine” for ten minutes can cause soreness over a long session. A slightly smaller tip that still passes the fit test is usually the more comfortable long-term choice.
Noise cancellation seems weaker after changing tips. ANC performance depends heavily on the acoustic seal. If cancellation dropped right after a tip swap, the new size is likely too small or the tip isn’t fully seated. Rerun the fit test.
One bud sounds quieter than the other. Check for wax blocking the tip’s mesh first — it’s the most common cause and takes seconds to inspect once the tip is off.
The buds won’t sit right in the charging case. If the case doesn’t close cleanly or the buds seem misaligned, a tip may be partially unseated or a third-party tip may be too bulky for the case. Reseat the tips, and if you’re using aftermarket foam tips, confirm they’re designed to fit inside the AirPods Pro 3 case.
The tips feel tacky or sticky over time. Skin oils build up on the silicone shell. Regular wiping helps, but if the surface has degraded, replacement is the clean fix.
If you’ve noticed your phone’s battery dipping faster during long listening sessions, that’s normal — streaming over Bluetooth for hours is a real drain. Our guide on why your phone battery is draining so fast walks through the most common causes and fixes.
Frequently Asked Questions
Are AirPods Pro 3 ear tips interchangeable with AirPods Pro 2 tips?
No. AirPods Pro 3 uses a redesigned tip with a different attachment mechanism, so tips from AirPods Pro 1st or 2nd generation won’t fit properly — and forcing them risks a tip that falls off inside your ear. Always buy tips labeled specifically for AirPods Pro 3.
How often should you replace AirPods Pro 3 ear tips?
There’s no fixed schedule — it depends on how often you wear them and how well you clean them. Most daily users benefit from fresh tips every few months, but the real triggers are visible tearing, foam that no longer rebounds, a loose fit on the connector, or grime that won’t clean off.
Can you use third-party memory foam tips on AirPods Pro 3?
Yes, several third-party manufacturers make foam tips for AirPods Pro 3, but check two things before buying: the listing must explicitly state AirPods Pro 3 compatibility, and the tips must fit inside the charging case so the buds still charge correctly.
Final Thoughts
Changing ear tips on AirPods Pro 3 is a thirty-second job once you’ve done it once: pinch the base, pull straight off, align the oval connector, and press until it clicks. The part that actually deserves your attention is sizing — the right tip transforms bass response, noise cancellation, and all-day comfort, while the wrong one undermines everything the earbuds can do. Take two minutes to run the Ear Tip Fit Test after every swap, keep the tips clean, and don’t hesitate to mix sizes between ears. Small effort, noticeably better sound.