
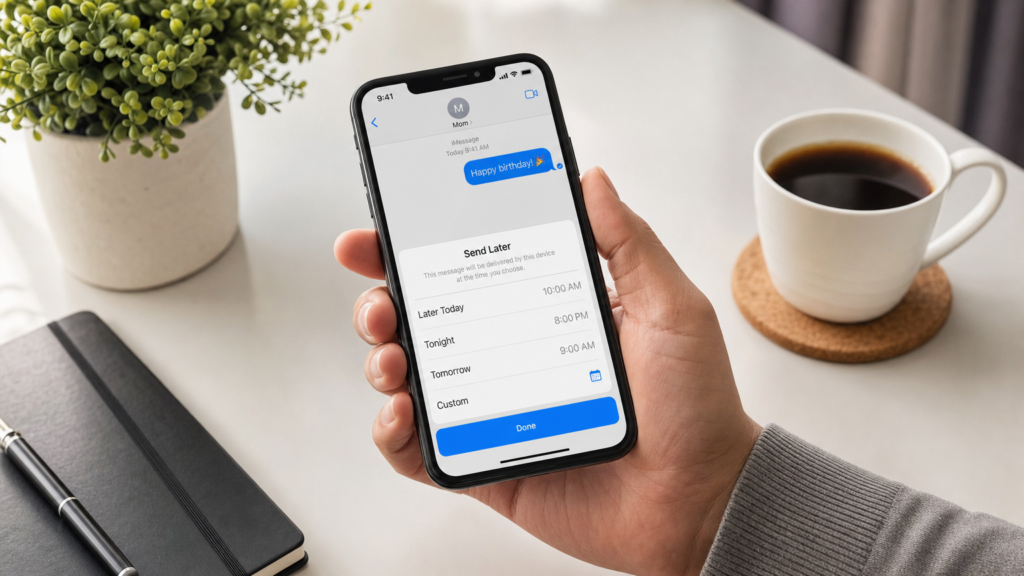
How to Schedule a Text Message on iPhone: 2 Easy Ways
Forgetting to send an important text message at the right time happens to everyone. Whether you want to send birthday wishes at midnight, remind someone about an appointment during business hours, or simply avoid interrupting someone late at night, knowing how to schedule a text message on iPhone gives you control over when your messages arrive. Apple introduced native scheduling capabilities in iOS 18, making it easier than ever to plan your communications ahead of time.
Before iOS 18, iPhone users had to rely on third-party apps or complex workarounds to schedule messages. Now, with the built-in Send Later feature in the Messages app and the flexible automation options in the Shortcuts app, you have multiple ways to schedule both iMessages and SMS texts directly from your device.
Key Takeaways
- iOS 18 introduced a native Send Later feature in the Messages app for scheduling texts without third-party apps
- You can schedule messages up to 14 days in advance using the built-in feature
- The Shortcuts app provides an alternative method with more advanced automation options
- Scheduled messages only send when your iPhone has an active internet or cellular connection
- You can edit or cancel scheduled messages anytime before they’re sent
Can You Schedule a Text Message on iPhone?
Yes, you can schedule text messages on iPhone, and you now have two native methods to do so. The first method uses the Send Later feature that Apple integrated directly into the Messages app with iOS 18. This feature works seamlessly for both iMessages (blue bubbles sent to other Apple users) and SMS texts (green bubbles sent to Android users or anyone without iMessage).
The second method involves using Apple’s Shortcuts app, which has been available since iOS 12 but gained more powerful automation capabilities over the years. This approach offers more flexibility for recurring messages or complex scheduling scenarios, though it requires a bit more setup.
To use the native Send Later feature, your iPhone must be running iOS 18 or later. You can check your iOS version by opening the Settings app, tapping General, then About. If you’re running an older version, you can update by going to Settings > General > Software Update.
The Send Later feature doesn’t require any additional downloads, third-party apps, or subscriptions. It’s completely free and works with your existing Messages app. Your scheduled messages are stored locally on your device and will send automatically at the specified time, as long as your iPhone has an active connection.
How to Schedule a Text with Send Later in Messages
The Send Later feature in the Messages app is the most straightforward way to schedule a text message on iPhone. Here’s exactly how to use it:
Open the Messages app and either start a new conversation by tapping the compose icon in the top-right corner or open an existing conversation with the person you want to message. Type your message in the text field as you normally would, but don’t tap the send button yet.
Instead of tapping send, press and hold the send button (the blue or green arrow icon) for about one second. A menu will appear with the option “Send Later” at the top. Tap this option to proceed to the scheduling interface.
The scheduling screen shows you several preset time options, including “Later This Evening” (if it’s currently daytime), “Tomorrow Morning,” or “Tomorrow Evening.” These presets automatically adjust based on the current time. You’ll also see a “Customize Time” option at the bottom of this menu.
To set a specific date and time, tap “Customize Time”. This opens a date and time picker where you can scroll through hours, minutes, and AM/PM options, as well as swipe to select a future date. The Messages app allows you to schedule messages up to 14 days in advance, giving you two full weeks of scheduling flexibility.
Once you’ve selected your desired time, tap the “Done” button in the top-right corner. Your message will now appear in the conversation thread with a small clock icon and a blue timestamp showing when it’s scheduled to send. The message will have a subtle blue highlight to distinguish it from already-sent messages.
The scheduled message remains in your conversation, visible only to you, until the scheduled time arrives. At the designated time, your iPhone will automatically send the message, and it will appear as a normal message to the recipient. They won’t see any indication that the message was scheduled unless you tell them.
One important note: your iPhone needs to be powered on and have an active internet connection (for iMessages) or cellular service (for SMS texts) at the scheduled send time. If your phone is completely off or in Airplane Mode when the scheduled time arrives, the message will send as soon as your phone reconnects to a network.
How to Schedule a Text Using the Shortcuts App
The Shortcuts app offers an alternative method for scheduling text messages with more advanced capabilities, particularly useful if you want to create recurring scheduled messages or combine text scheduling with other automated actions. This method works on iOS 14 and later, making it available to users who haven’t upgraded to iOS 18 yet.
First, open the Shortcuts app on your iPhone. If you’ve never used it before, you’ll find it in your app library or by searching for “Shortcuts” in Spotlight. The app comes pre-installed on all iPhones running iOS 13 or later.
Tap the plus (+) icon in the top-right corner to create a new shortcut. This opens the shortcut editor where you’ll build your automated text message. The interface shows a blank canvas with an “Add Action” button at the bottom.
Tap “Add Action” and use the search bar to find “Send Message.” Select the “Send Message” action from the results. This action allows you to send texts through the Messages app programmatically.
In the Send Message action block, tap where it says “Message” and type the text you want to send. Then tap “Recipients” and select the contact or enter the phone number of the person who should receive this message. You can add multiple recipients if you want to send the same message to several people.
Now you need to add the scheduling component. Tap the “Add Action” button again and search for “Wait.” Select the “Wait” action and configure how long the shortcut should wait before sending the message. You can set the wait time in seconds, minutes, or hours.
For more precise scheduling, there’s a better approach. Instead of using the Wait action, tap “Add Action” and search for “Run Shortcut at Time.” However, for the most reliable scheduled sending, you’ll want to set up an automation instead of a manual shortcut.
Go back to the main Shortcuts screen and tap the “Automation” tab at the bottom. Tap the plus (+) icon to create a new automation. Select “Time of Day” as your trigger. This lets you specify exactly when the automation should run.
Set your desired time and date, then choose whether this should be a one-time event or repeat daily, weekly, or monthly. Tap “Next” to proceed to the action setup. Now add the “Send Message” action just like before, with your message text and recipient(s).
Before finishing, make sure to turn off “Ask Before Running” in the automation settings. If this is enabled, your iPhone will show you a notification asking for confirmation before sending the message, which defeats the purpose of automation. With this setting off, the message will send automatically at the scheduled time.
Tap “Done” to save your automation. The scheduled text will now appear in your Automation list, showing the trigger time and the actions it will perform. As with the Send Later feature, your iPhone must be on and connected at the scheduled time for the message to send.
According to Apple’s Shortcuts User Guide, automations can include multiple actions, so you can combine sending a scheduled text with other tasks like setting a reminder, adjusting device settings, or logging the event to a note.
How to Edit or Cancel a Scheduled Message
One of the most useful aspects of scheduling text messages is the ability to change your mind. Both scheduling methods allow you to edit or cancel messages before they’re sent, though the process differs slightly between the two approaches.
Editing or Canceling Send Later Messages
For messages scheduled using the Send Later feature in the Messages app, the process is remarkably simple. Open the Messages app and navigate to the conversation containing your scheduled message. You’ll see the message displayed with a clock icon and blue highlight.
Press and hold on the scheduled message. A menu will appear with three options: “Send Now,” “Edit Time,” and “Delete.”
If you want to change when the message sends, tap “Edit Time.” This brings back the scheduling interface where you can select a different preset time or customize a new specific date and time. Make your changes and tap “Done” to update the scheduled send time.
To cancel the scheduled message entirely, tap “Delete” from the menu. The message will be removed from the conversation and won’t send at all. If you want to send the message immediately instead of waiting for the scheduled time, tap “Send Now” and it will dispatch right away.
You can also edit the actual message content before it sends. Tap the scheduled message once to select it, then you’ll see options to edit the text. Make your changes and the updated version will send at the scheduled time. This is particularly useful if you notice a typo or want to add additional information.
Managing Shortcuts and Automations
If you scheduled your message using the Shortcuts app, you’ll need to manage it through that app instead. Open Shortcuts and navigate to either your Shortcuts list or the Automation tab, depending on which method you used.
For a one-time shortcut, simply tap the three dots on the shortcut’s card to open the editor. You can modify the message text, recipient, or wait time, then tap “Done” to save your changes. To delete the shortcut entirely, swipe left on it and tap “Delete.”
For automations, tap the “Automation” tab and find your scheduled message automation in the list. Tap it to open the details, then tap “Edit” in the top-right corner. You can modify the trigger time, change the message content, or adjust the recipients.
To temporarily disable an automation without deleting it, toggle the switch next to the automation name. The automation will remain in your list but won’t run at the scheduled time. Toggle it back on whenever you want to reactivate it.
To permanently remove an automation, swipe left on it in the Automation list and tap “Delete,” or open the automation, tap the three dots in the top-right corner, scroll to the bottom, and select “Delete Automation.”
What to Know About iMessage, SMS, and Recipient Devices
Understanding the difference between iMessage and SMS is crucial when scheduling text messages, as it affects delivery, features, and what recipients can see. The Messages app handles both types of messages, but they work differently behind the scenes.
iMessages are sent over the internet through Apple’s servers and appear as blue bubbles in the Messages app. They only work between Apple devices (iPhones, iPads, and Macs) where iMessage is enabled. iMessages support rich features like read receipts, typing indicators, high-quality photos and videos, reactions, and effects.
SMS texts are traditional text messages sent through your cellular carrier’s network and appear as green bubbles. These are the messages you send to Android users or anyone without iMessage enabled. SMS has limitations including a 160-character limit per message segment, no read receipts, lower-quality media sharing, and potential carrier charges depending on your plan.
When you schedule a message, the Messages app determines whether to send it as an iMessage or SMS based on the recipient’s device and settings. If you’re messaging another iPhone user with iMessage enabled and both of you have an internet connection, it will send as an iMessage. Otherwise, it falls back to SMS.
This distinction matters for scheduled messages because iMessages require an internet connection (Wi-Fi or cellular data) while SMS texts require cellular service. If your iPhone is connected to Wi-Fi but doesn’t have cellular service, scheduled iMessages will send successfully, but scheduled SMS texts won’t until you regain cellular service.
You can tell which type of message you’re scheduling by looking at the send button color before you schedule it. A blue send button indicates an iMessage, while a green send button means SMS. This color coding continues after scheduling—scheduled iMessages show a blue clock icon while scheduled SMS messages show a green one.
Recipients cannot tell that a message was scheduled unless you inform them. Once the message sends at the designated time, it appears in their conversation as if you had manually sent it at that moment. The timestamp shows the actual send time, not when you originally scheduled it.
One limitation to be aware of: if you schedule a message to an iMessage user but they’ve since turned off iMessage or switched to an Android device, your scheduled message might fail to send or automatically convert to SMS. The Messages app will typically handle this conversion automatically, but it’s something to keep in mind for long-scheduled messages.
Troubleshooting Scheduled Text Messages on iPhone
While scheduling messages on iPhone is generally reliable, you may occasionally encounter issues. Here are the most common problems and their solutions.
Scheduled Message Didn’t Send
If a scheduled message didn’t send at the designated time, the most common cause is lack of connectivity. Your iPhone must be powered on and connected to either the internet (for iMessages) or your cellular network (for SMS) at the scheduled send time.
Check your connection status by opening Control Center and verifying that Airplane Mode is off and you have either Wi-Fi or cellular bars showing. If your phone was off or in Airplane Mode at the scheduled time, the message should send automatically once you reconnect.
Another potential issue is Low Power Mode. When your iPhone enters Low Power Mode, it reduces background activity and may delay scheduled message sending. You can check if Low Power Mode is active by looking for the yellow battery icon in the status bar, or by going to Settings > Battery.
For messages scheduled through the Shortcuts app, verify that the automation is still enabled and the “Ask Before Running” setting is turned off. If this setting is on, your phone displays a notification requiring confirmation, which you might have missed.
Can’t Find the Send Later Option
If you don’t see the Send Later option when pressing and holding the send button, first confirm you’re running iOS 18 or later. Go to Settings > General > About to check your version. If you’re on an older iOS version, you’ll need to update your iPhone or use the Shortcuts method instead.
Make sure you’re pressing and holding the send button for at least one second. A quick tap will send the message immediately instead of bringing up the scheduling menu. The send button is the arrow icon on the right side of the text input field.
If you still don’t see the option after updating to iOS 18, try force quitting and reopening the Messages app. Double-click the home button (or swipe up from the bottom on Face ID models), find Messages in the app switcher, and swipe it up to close it. Then reopen Messages and try again.
Scheduled Message Shows Wrong Time
If your scheduled messages are sending at incorrect times, check your iPhone’s time and date settings. Go to Settings > General > Date & Time and ensure “Set Automatically” is enabled. This syncs your iPhone’s clock with your cellular network or internet connection.
Also verify your time zone is correct, especially if you’ve recently traveled. Scheduled messages use your iPhone’s current time zone, so if this is wrong, messages will send at the wrong local time. You can manually set your time zone in Settings > General > Date & Time if automatic detection isn’t working.
Recipient Says They Never Received the Message
If your scheduled message shows as sent but the recipient claims they didn’t receive it, this is likely a general message delivery issue unrelated to scheduling. For iMessages, check that the message bubble is blue and shows “Delivered” underneath. If it says “Not Delivered” in red, tap it and select “Send as Text Message” to retry via SMS.
For SMS messages, delivery confirmation depends on your carrier. Some carriers don’t provide delivery receipts for standard text messages. If you consistently have issues with messages not reaching Android users, contact your carrier to ensure SMS messaging is properly configured on your account.
Similar to scanning QR codes from screenshots on iPhone, working with scheduled messages is easier when you understand the underlying technology and requirements. Just as you might need to connect your AirPods to different devices for seamless communication, mastering message scheduling expands your iPhone’s communication capabilities.
Frequently Asked Questions
How far in advance can I schedule a text message on iPhone?
Using the Send Later feature in the Messages app, you can schedule messages up to 14 days (two weeks) in advance. The Shortcuts app method has no built-in limit on how far ahead you can schedule, though setting up automations too far in advance increases the chance you’ll forget about them or circumstances will change.
Will scheduled messages send if my iPhone is turned off?
No, your iPhone must be powered on for scheduled messages to send. However, if your phone is off or in Airplane Mode at the scheduled send time, the message will automatically send as soon as you turn your phone back on and reconnect to a network. The message won’t be lost—just delayed.
Can the recipient tell that I scheduled the message?
No, recipients cannot tell that a message was scheduled. Once the message sends at the designated time, it appears in their conversation exactly like any other message, with a timestamp showing when it was actually sent. The only person who sees scheduling indicators is you, before the message is sent.
Conclusion
Scheduling text messages on iPhone has become significantly easier with iOS 18’s native Send Later feature, eliminating the need for third-party apps or complicated workarounds. Whether you use the simple built-in option in Messages or the more powerful automation capabilities of the Shortcuts app, you now have reliable tools to send messages at exactly the right time. Remember that your iPhone needs an active connection at the scheduled send time, and you can always edit or cancel scheduled messages before they’re sent. With these techniques, you’ll never miss sending an important message again, whether it’s a birthday greeting, a business reminder, or just a thoughtful check-in sent at a considerate hour.